

Images are the backbone of engaging websites, but they can also be your site’s biggest performance bottleneck. For small and medium-sized businesses running WordPress sites, finding the sweet spot between stunning visuals and fast loading times is important for both user experience and search engine rankings.
Poor image optimisation can slow your website to a crawl, frustrate visitors, and hurt your Google rankings. However, with the right techniques, you can optimise WordPress images effectively while maintaining the visual quality that showcases your products and services professionally.
Why Image Optimisation Matters for Your Business Website
Before diving into the how-to, it’s essential to understand why image optimisation should be a priority for your WordPress site, or any website really. Unoptimised images can increase page load times by several seconds, and studies show that 40% of visitors abandon websites that take longer than three seconds to load.
Search engines like Google factor page speed into their ranking algorithms, meaning slow-loading images directly impact your visibility in search results. For small businesses competing online, this can be the difference between landing on the first page of Google or being buried on page ten.
Additionally, faster websites provide better user experiences, leading to higher conversion rates, longer session durations, and increased customer satisfaction. When you optimise WordPress images properly, you’re investing in both your technical SEO and your bottom line.
Understanding Image File Formats: Choosing the Right Type
The foundation of effective image optimisation starts with selecting the appropriate file format for each use case. WordPress supports several image formats, each with distinct advantages for different scenarios.
| Format | File Size | Quality | Transparency | Best Used For | Browser Support |
| JPEG | Small | Good | No | Photos, complex images | Universal |
| PNG | Large | Excellent | Yes | Logos, graphics, simple images | Universal |
| WebP | Very Small | Excellent | Yes | All image types | Modern browsers (95%+) |
| GIF | Medium | Poor | Yes | Simple animations only | Universal |
| SVG* | Tiny | Perfect | Yes | Icons, simple graphics | Universal |
*Despite their advantages in web design, SVG files require careful handling due to their ability to execute embedded code. This scripting functionality, while useful for interactive graphics, can be exploited by attackers to inject malicious content, redirect users to harmful sites, or install unwanted software. The best way to secure SVG files is by installing WPCode Plugin and adding a snippet, or you can install a plugin like Safe SVG.
JPEG files work best for photographs and images with many colours, offering excellent compression while maintaining reasonable quality. These files are ideal for product photos, team headshots, and detailed graphics where file size matters more than perfect clarity.
PNG files excel when you need transparency or crisp lines, making them perfect for logos, icons, and graphics with limited colours. While PNG files are typically larger than JPEGs, they maintain sharp edges and support transparent backgrounds essential for professional branding.
WebP represents the newest standard, providing superior compression compared to both JPEG and PNG while maintaining comparable quality. Modern browsers widely support WebP, making it an excellent choice for forward-thinking businesses wanting to maximise performance.
7 Quick Ways to Reduce Image File Sizes Without Losing Quality
1. Choose the Right Compression Level: Start with 85% quality for JPEGs and adjust down until you notice quality degradation, then step back one level.
2. Remove Unnecessary Metadata: Strip EXIF data, colour profiles, and other metadata that add file size without visual benefit using tools like ImageOptim or TinyPNG.
3. Crop Strategically: Focus on the most important part of your image and crop out unnecessary background elements that don’t add value.
4. Use Progressive JPEG: Enable progressive encoding so images load gradually, appearing to load faster even if file sizes remain similar.
5. Convert to WebP When Possible: Modern browsers support WebP format, which typically reduces file sizes by 25-50% compared to JPEG with equivalent quality.
6. Optimise Colour Palettes: For PNG images, reduce the number of colours in the palette when the image doesn’t require the full spectrum.
7. Apply Blur to Backgrounds: Slightly blur non-essential background areas, as blurred regions compress more efficiently than sharp details.
Resizing Images: Getting Dimensions Right from the Start
One of the most impactful ways to optimise WordPress images is ensuring they’re properly sized before uploading. Many business owners make the mistake of uploading massive images and letting WordPress handle the resizing, which creates unnecessary storage bloat and processing overhead.
WordPress automatically creates multiple image sizes when you upload files, but starting with appropriately sized originals prevents waste and improves performance. For most business websites, full-width images rarely need to exceed 1920 pixels wide, while sidebar images typically work well at 300-400 pixels wide.
Consider your website’s layout when determining image dimensions. A three-column product grid might display images at 400 pixels wide on desktop, so uploading 4000-pixel images wastes resources without improving visual quality. Taking time to resize images before uploading saves server space and reduces processing time.
Modern image editing tools, including free options like GIMP or online services like Canva, make resizing straightforward. Batch processing tools can handle multiple images simultaneously, making this process efficient even for businesses with extensive image libraries.
5 WordPress Image Optimisation Plugins You Should Know About
1. Smush by WPMU DEV: The most popular free option with automatic compression upon upload, bulk optimization capabilities, and lazy loading features. Perfect for beginners who want set-and-forget functionality.
2. ShortPixel Image Optimiser: Offers superior compression algorithms with WebP conversion and advanced features. The free tier provides 100 images monthly, with affordable paid plans for higher volume needs.
3. Imagify: Created by the WP Rocket team, focusing on aggressive compression while maintaining visual quality. Excellent for businesses prioritising speed over perfect image fidelity.
4. EWWW Image Optimizer: Provides comprehensive optimisation including automatic format conversion and granular control options. Ideal for businesses wanting detailed optimisation settings.
5. Optimole: Offers real-time image optimisation and CDN delivery, automatically serving the best format and size for each visitor’s device and connection speed.
Compression Techniques That Preserve Visual Quality
Effective compression reduces file sizes while maintaining the visual quality your customers expect. The key lies in understanding the difference between lossy and lossless compression and applying each appropriately.
Lossy compression, used by JPEG files, removes some image data to achieve smaller file sizes. The trick is finding the compression level that significantly reduces file size without creating visible artifacts. Most images can handle 80-85% quality settings without noticeable degradation, often reducing file sizes by 50% or more.
Lossless compression maintains perfect image quality while removing unnecessary metadata and optimising file structure. This approach works well for PNG files and situations where image quality cannot be compromised, such as detailed product catalogues or professional portfolios.
Online compression tools like TinyPNG or ImageOptim provide easy ways to compress images before uploading to WordPress. These services often achieve impressive compression ratios while maintaining visual quality that satisfies most business needs.
For businesses handling many images regularly, establishing a compression workflow before uploading ensures consistent optimisation without requiring technical expertise from every team member.
10 Image Optimisation Mistakes That Are Slowing Down Your WordPress Site
1. Uploading Massive Images: Using 5000×3000 pixel images when your website displays them at 800×600 pixels wastes bandwidth and storage space unnecessarily.
2. Ignoring Alt Text: Missing alt text hurts both SEO and accessibility, while keyword-stuffed alt text can harm your search rankings.
3. Using PNG for Photos: Choosing PNG format for complex photographs instead of JPEG can result in files 3-5 times larger than necessary.
4. Over-Compressing Images: Pushing compression too far creates visible artifacts that make your business look unprofessional and cheap.
5. Forgetting Mobile Users: Not considering how images appear and load on mobile devices where bandwidth and screen sizes differ significantly.
6. Skipping Image Resizing: Letting CSS resize large images instead of uploading properly sized files wastes resources and slows loading times.
7. Inconsistent Optimisation: Having some optimised images and others unoptimised creates uneven user experiences across your website.
8. Using Generic File Names: Names like “IMG_1234.jpg” provide no SEO value compared to descriptive names like “blue-widget-product-photo.jpg”.
9. Not Testing Compression Levels: Accepting default compression settings without testing what works best for your specific image types and quality requirements.
10. Avoiding Modern Formats: Sticking with older formats like JPEG and PNG when WebP could provide significantly better compression and quality.
Implementing Lazy Loading for Better Performance
Lazy loading delays image loading until users scroll to view them, dramatically improving initial page load times. This technique particularly benefits businesses with image-rich pages like product catalogues, portfolios, or blog posts with multiple photos.
WordPress includes native lazy loading for images as of version 5.5, automatically applying this technique to most images without additional configuration. However, some themes and plugins may override this behaviour, requiring manual implementation or plugin assistance.
Several plugins enhance WordPress’s built-in lazy loading, offering additional features like placeholder images, fade-in effects, and mobile-specific optimisations. These enhancements can improve user experience while maintaining the performance benefits of delayed loading.
For businesses using page builders or custom themes, ensuring lazy loading works correctly across all pages requires testing. Some dynamic content or slider plugins may conflict with lazy loading, requiring specific configuration or alternative solutions.
The performance impact of lazy loading is most noticeable on pages with many images, making it particularly valuable for e-commerce sites, galleries, and content-heavy blogs that small businesses often maintain.
Setting Up Responsive Images for Mobile Users
With mobile traffic accounting for over half of web visits, ensuring images display properly across all device sizes is important for business success. WordPress automatically generates multiple image sizes, but leveraging them effectively requires understanding responsive image implementation.
The WordPress srcset attribute automatically serves appropriately sized images based on screen size and resolution, reducing bandwidth usage on mobile devices while maintaining quality on desktop displays. This feature works automatically for most themes but may require verification on custom implementations.
Mobile users often browse on slower connections, making image optimisation even more importnat for this audience. Properly implemented responsive images can reduce mobile page load times significantly, improving user experience and reducing bounce rates among mobile customers.
Testing your website’s image performance across various devices and connection speeds helps identify optimisation opportunities. Tools like Google PageSpeed Insights provide mobile-specific recommendations, highlighting areas where image optimisation can improve mobile user experience
6 Free Tools Every Small Business Can Use for Image Optimisation
1. TinyPNG/TinyJPG: Web-based compression tool that reduces PNG and JPEG file sizes by up to 80% while maintaining visual quality. Perfect for quick optimization of individual images.
2. ImageOptim (Mac) / FileOptimizer (Windows): Desktop applications that remove unnecessary metadata and apply lossless compression to multiple image formats simultaneously.
3. GIMP: Free, open-source image editor with powerful resizing, cropping, and export optimization features. Excellent alternative to expensive professional software.
4. Canva: Online design tool with built-in image optimisation and resizing features, perfect for creating social media graphics and web images at proper dimensions.
5. Google PageSpeed Insights: Analyses your website’s image performance and provides specific recommendations for optimisation improvements.
6. Squoosh by Google: Advanced web-based image compression tool that lets you compare different formats and compression levels side-by-side before downloading.
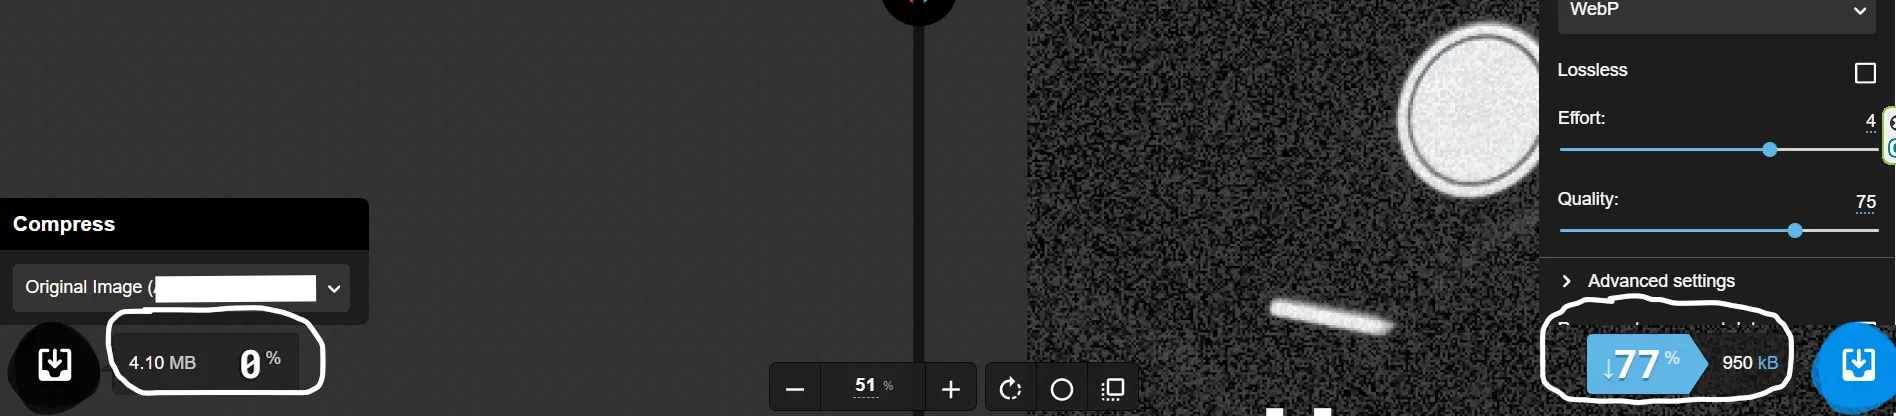
Using Squoosh, this image was taken from it’s original size of 4.10MB to 950Kb, I then further optimised it to a size of 63Kb which is what you’re seeing now
Optimising Images for SEO and Accessibility
Beyond performance benefits, properly optimised images contribute to search engine visibility and website accessibility. These factors become increasingly important as search engines emphasise user experience and accessibility in their ranking algorithms.
Alt text provides important context for search engines and screen readers, helping both understand image content. Effective alt text describes images concisely while incorporating relevant keywords naturally, supporting both SEO goals and accessibility requirements.
File names offer another SEO opportunity, with descriptive names like “blue-widget-product-photo.jpg” providing more context than generic names like “IMG_1234.jpg.” This practice helps search engines understand image relevance while organising your media library more effectively.
Image captions, while not always necessary, can provide additional context and keyword opportunities when relevant to your content strategy. Captions are particularly valuable for product images, team photos, and instructional content where additional context benefits users.
Structured data markup can help search engines understand image context within your content, potentially earning rich snippets or image search visibility that drives additional traffic to your business website.
Monitoring and Maintaining Image Performance
Ongoing monitoring ensures your image optimisation efforts continue delivering results as your website grows and evolves. Regular performance audits help identify new optimisation opportunities and catch issues before they impact user experience.
Google PageSpeed Insights provides detailed image optimisation recommendations, highlighting specific files that need attention and suggesting compression improvements. Regular checks help maintain optimal performance as you add new content.
Website monitoring tools can track page load times and identify performance regressions related to image handling. Setting up alerts for significant performance changes helps catch issues quickly, preventing prolonged negative impacts on user experience.
Regular media library cleanup removes unused images that consume server space without providing value. This maintenance becomes increasingly important for businesses that frequently update content or test different images for marketing campaigns.
Key Takeaways: Building a Sustainable Image Optimisation Strategy
Successfully optimising WordPress images requires balancing file size reduction with visual quality while considering user experience across all devices. For small and medium-sized businesses, implementing systematic image optimisation provides significant returns through improved search rankings, faster page loads, and better user engagement.
Start with the basics: choose appropriate file formats, resize images before uploading, and implement reasonable compression levels. These foundational practices provide immediate benefits while establishing good habits for ongoing content creation.
Consider automation through WordPress plugins to maintain consistent optimisation without requiring manual processing for every image. The time invested in setting up automated optimisation pays dividends through ongoing performance improvements.
Remember that image optimisation is an ongoing process rather than a one-time task. Regular monitoring and maintenance ensure your efforts continue providing value as your website grows and web technologies evolve.
Need help with image optimisation? I offer WordPress optimisation services tailored to small business websites.